Thursday, May 30, 2019

After School Makerspace Program 2018-2019

This year, the Makerspace Mentors of Ashland High School ran 8 after school programs for local middle school students and elementary school students. These programs included, 3D design, 3D printing, woodworking, electronics, scratch, technology tear down, and flying objects. It was such a privilege to be able to serve as a mentor and get to know so many creative and fun kids in our district. Here are some highlights of the past year:

 The Mindess elementary school students started off the year with a 3D design course. Mentors helped students learn how to use various tools in our makerspace, the Ashland Innovation Center. These tools included the styrofoam cutter and the scroll saw. This allowed the kids to become more familiar with the space and learn how to safely use power tools.

The children made fantastic projects spanning everything from the kawaii cactus (left) to a soccer net. As a mentor, it was really cool to see the fantastic things that the students could come up with, and it was gratifying to see them learn how to turn their imagination into reality.


Another Mindess session was woodworking. Mentors taught the kids how to responsibly use saws, hammers, drills, and more to create beautiful wooden creations. The kids chose to make either wooden frames or wooden boxes. It truly was a test of patience and precision, but they all successfully completed their projects.Then, they went on to make their own projects with the skills that they learned.


The Middle schoolers really enjoyed our new technology tear down session. Mentors showed students how to take apart computers, keyboards, toys, and more. Then, they made their own creations from salvaged parts.

This session encouraged students to pursue their curiosity and learn what's inside of everyday objects. They learned how to be not afraid to break things and to recycle electronic components.

Many thanks to all who donated tech to be taken apart, and we are always looking for donations!


To end the year for the Mindess kids, we ran a flying objects program. Students had the opportunity to make their own rockets, catapults, and miniature ziplines. They also got to play with wooden catapults that the high schoolers made and they got to fly drones.

We started by teaching the kids to make soda straw rockets to introduce them to the principles of flying objects. Then we moved to catapults to teach them about projectiles, and finished off the rocketry segment by making air pressure rockets.

Having the kids fly drones was quite a risk, but it was worth it as the kids and the mentors had so much fun.


Next year, we will continue to run programs and will introduce new sessions as well. Until then, have an awesome summer vacation!

Monday, January 14, 2019

Ashland High School's Girls Who Code Club

Image result for girls who code
Girls Who Code is a national movement that includes over 90,000 girls across the country. It's goal is to promote a safe and supportive environment where girls can learn how to code. Each chapter chooses a Community Impact project and creates projects that bring attention to that cause. This year, our chapter here at Ashland High School decided to bring attention to the cause "Save the Whales"

Image result for whale clipartGetting Started

At the start of the year, we decided to code with the purpose of "saving the whales." Personally, I feel that having this cause in mind motivates me to learn how to code. It definitely seems more purposeful.

In order to fund our club for the year, we pitched our ideas for this year to the Bose STEM Seed Fund. After meeting with them, they generously gave us a grant to support our coding for this year. Thank you, Bose!

Progress 

So far this year, we have been working on a main website where we can show all our mini projects and going through the coding tutorials that GWC provides in order to learn how to code. Right now we are trying to make a quiz game to test people whale knowledge and provide them with surprising statistics. We are also trying to make a game to show how pollution affects the whale population. We would like to present accurate statistics and facts for our website, so we have also been extensively researching whale facts. 

Goals

We look forward to completing these goals by the end of the year:
  1. Complete and publish the central website.
  2. Complete our mini projects, including a quiz and a game.
  3. Find a specific non-profit to support
We are very excited to continue our GWC journey and are thankful to Girls Who Code for giving us this opportunity. 

Sunday, June 10, 2018

Reflections on Being a Makerspace Mentor

It's hard to believe that the 2017-2018 school year is coming to a close! This year, I had the privilege of serving as a Makerspace Mentor at the Ashland Innovation Center. I've learned a lot from the programs ranging from 3D Design to Robotics.

As a mentor, I am involved in planning the curriculum for each session. In the beginning of the year, I was really nervous. I would meticulously plan out each day, only to have the plans ruined by either moving too fast or too slow. So from working with the
kids this year, I learned that I don't have to plan each day down to the minute, and a loose plan of each day is best. However, it's also important to have extra activities planned in case some finish early.

Another lesson I learned is that we learn best by doing. Especially after school, elementary school aged children don't want to sit through another lesson or powerpoint. By giving the kids more time to explore, I noticed that the kids were more interested and seemed to learn more. For me, this meant taking a step back and not flying to the rescue to solve every little problem.

This year, I worked with an awesome group of kids and a fantastic group of fellow mentors. It's been really fun this year and I'm looking forward to seeing everyone again in the fall. Have an awesome summer!

PS: Check out the Ashland Innovation Center's new website!

Tuesday, April 10, 2018

3D Printing with Mindess

Almost every week at the Ashland Innovation Center, high school students serve as "Makerspace Mentors" and help Middle School and Mindess (grades 3-5) students learn about STEM. The most recent session of the AIC Mindess program was 3D Printing. It's been really fun and a great experience for everyone involved.

Monday, March 19, 2018

Soldering Iron: What is it and how does it work?


All About the Soldering Iron


              A soldering iron is a hand tool used in soldering. It supplies heat to melt solder so that it can flow into the joint between two work pieces. A soldering iron is composed of a heated metal tip and an insulated handle. The soldering iron here at the MakerSpace is typically used for fusing wires together with solder, and can really come in handy with circuitry.

Vinyl Cutter: Advanced Tips and Tricks

Vinyl Cutter: Advanced Tips and Tricks

Ben Pepper

Tip #1: Welding

     In the top left hand corner of the screen in Graphtec Studio, there is a button called "Weld selected shapes into one shape." This button can be very useful in making complex shapes.To use it, two or more shapes must be highlighted by dragging the mouse over them. When this happens, the button will turn from a light gray to a dark gray, informing the user that the selected shapes can be grouped together. Once this button is pressed, the selected shapes will combine into one shape. This can be very useful in making complex shapes out of simple shapes. For example, the Mickey Mouse logo can be made easily by grouping one big circle and two smaller circles on top of it. The weld button will combine all of these shapes and make the sticker look just like the logo. Knowing about this button allows people to make exactly what they desire to make by the use of complex shapes.

Tip #2: Roll-1 Front Edge

Using the Raspberry Pi

The Raspberry Pi is a miniature computer that is able to run and conduct code. It is able to perform many functions that a PC computer can, like playing games, browsing the internet, and other things like that. To use it, you plug it into your computer, and control it using a mouse. It is also a teaching tool, and teaches many people how to code. It also teaches them more about computers and how they work.

Friday, March 16, 2018

Working with Arduino

Image result for arduino
          Arduinos is a single board micro-controller that functions as a miniature computer. They can be used for many things, including turning on and off lights in a precise manner, as well as working with sensors. In this post, I will give a brief introduction to Arduinos and how to use them.
Image result for arduino wire         Arduinos need to be plugged into a computer to receive code, however they can run the code on their own if connected to a power source. They should be connected to the computer through a standard USB wire attached to the Arduino by the black box in the lower left corner of the image to the right.

Aspects of 3D Design: Backlash

Aspects of 3D design


In this blog I hope to chronicle the lessons I learn throughout my process of designing my own creations. My goal is to be able to help others create their own designs, while avoiding the same mistakes that I have made.

What is Backlash?


In terms of 3D design, backlash is the term to describe the amount to space between moving parts before they actually begin to touch. In other words, it is the gap between different pieces of your design.

Why is Backlash Important?

Backlash is a necessary component to creating a final product with moving parts or that must be assembled from what you have made.

Girls Who Code at the Ashland Innovation Center

Image result for girls who code
Recently, a few of us here at AIC decided to start a chapter of Girls Who Code for high school students at Ashland High School. Girls Who Code is a national movement started by Reshma Saujani, and the goal is to increase the number of women in Computer Science and STEM. Even if a club member doesn't decide to pursue computer science in the future, coding is still a valuable skill to have in many different fields today.

Friday, December 15, 2017

AHS Robot Rodeo!

The Ashland High School Robotics Club recently hosted their third annual Robot Rodeo! Find out what the Robot Rodeo is all about by watching the video below. 

Thursday, December 7, 2017

Proxxon Thermocut Hot Wire Cutter Tutorial

Proxxon Thermocut Hot Wire Cutter
Overview
Image result for proxxon thermocut hot wire cutterWe are lucky enough to have our own hot wire cutter than can be used for cutting materials such as plastic and foam. The hot wire heats up and melts and cuts the materials in lines and curves so that many creations can be formed at ease. Styrofoam is very bumpy and hard to cut, but by using the Proxxon Thermocut, all creations are made quickly, easily, and smoothly

Instructions
  1. The first step of any tutorial is to plug it in, and make sure that the chord does not get in the way or drapes over the machine because the wire will be hot. Also, if you have long hair, make sure to tie it back.
  2. At the top of machine where the wire is attached, there is a metal part that holds the wire in place. Before you cut, make sure to adjust it so that the wire is vertically aligned and that it is tight and won’t move. This can be done by tightening the knob on the backside of the picture to hold the position of the wire. to make the wire straight, thread it through the notch on the end of the metal piece on the top.
  3. On top of the wire spool is another knob. This one holds the spool in place, and should also be tightened to insure that the wire will not move. Twisting the knob will tighten the grip on the spool.
  4. Adjust the hot wire so that it is taut. It should run straight vertically, and not have any slack to get the best cut. This can be done by twisting the spool of wire at the top of the machine. It can also be controlled with the knob to the left of the red light on the bottom by the switch controls. this tightens the lower grip on the wire.
  5. Once everything is squared away, adjust the temperature accordingly based on the density and thickness of the material. This can be adjusted using the knob to the right of the red light, and by using the guide printed on the side of the machine.
  6. Switch on the machine and happy cutting! To cut your material, simply slide it along the surface to get the most precise cut. There are grid lines on the surface of the machine to aid with cutting, as well as a protractor and other tools that could be useful for any project.
    1. Pro tip! If you would like to cut out a shape with a hole in the center, but you don't want the cut out line to get to it, you can remove the wire and place it in the center of your cutout. Turn off the hot wire cutter, and using the knob to the left of the light, loosen it all the way and pull out the wire. (this is also how you can change/cut it and get fresh wire). In order for this to work, a small hole needs to get poked through the inner hole. You can use things like pencils, or anything skinny and sharp that will make a hole.Then put your material through the wire after its reattached, and cut out the middle hole. After the cut is made, turn off the cutter, and take out and put in the wire again.The picture shown above is an example of a square with a cut-out hole in the middle.
  7. CAUTION! Once the machine is turned on, the wire heats up automatically and it ready to be used right away. This means that there is no wait time to let it heat up, and also that it gets very hot very quickly so be careful.


Common Problems for the Flashforge Creator Pro 3D printer

Common Problems of the 3D printer

Our Printer

The Two printers currently in the makerspace are the Flashforge Creator Pro and the Reprap Guru. In this blog post, I will be focusing on the creator pro printer, although, a lot of the information in this post should apply to both printers.

Problems

Plastic does not adhere to print bed

This is the most common problems that affects the 3D printer and has a very simple solution. When the plastic extruded onto the print bed comes off the bed while printing, it is most likely because the print bed is too low under the extruder, so the plastic cannot adhere and becomes unstuck.

To align the print bed, go into the utilities menu and select "level home plate" to begin. Then take the thin plastic sheet (at right) stored with the printer's tools. To level the build plate, slide the paper under the extruder of the printer, then manually move the extruder around the plate and slide the paper around underneath it. The goal of this is to have the paper be able to move, but the extruder plate should be high enough to cause a small amount of friction between it and the paper. in any areas where this is not true, adjust the hight of the print bed in the different areas by twisting the knobs underneath the print bed


Loading and Unloading Filament

One of the most common practices of the 3D printer is to load and unload filament, switching them to a different color or plastic type.

To accomplish this, first select "filament loading "in the utilities menu


From there, select to "load right" or "load left" depending on which extruder you plan to change. Do not select unload, even when unloading filament, instead, plan to unload the first filament and load the second while the printer is heated for loading the correct extruder. To avoid clogging when loading, make sure the printer is "loading" not "unloading", and be sure to preform the entire transfer without stoping the printer from heating.

After the printer is heated, to unload the first filament, press down the switch on the right or left of the extruder (depending on which side you are loading) in order to release the clamp on the filament, then pull the filament out of the extruder and removing it from the plastic tube that leads from the back of the printer, where the filament spools rest, to the extruder. (these tubes can be easily pulled out of and into the extruder for convenience). Do not hit the "ok" button yet as that will stop the printer from heating.

Once the first filament is removed, feed the second filament back through the plastic tube and into the extruder. Once the filament enters the extruder, it should be caught by the clamp inside and will begin to be slowly pushed into the extruder. Allow this process to run until the filament begins to exit the extruder. Once this is completed, hit the "ok" button to stop the process and the filament loading is complete.

Replacing the Sticker on the Print Bed

To replace the sticker on the printer bed, first preheat the bed. Use the "preheat settings" in the utilities menu to adjust the temperature to be 80 degrees Celcius.

Once the print bed had been heated, peel the sticker off the bed, watch out as the printer bed will be very hot, so use some sort of tool to begin the peeling, then use your hand one the sticker begins to come off.

Clogged Extruder

A clogged extruder can be one of the most obnoxious problem for the 3D printer. It can often be hard to fix; however, proper loading and unloading of filament should prevent this from happening.

The first step is to preheat the extruder to its maximum temperature. Since clogging usually happens when the plastic melts before entering the extruder, it is important to heat the extruder as hot as possible and allow the plastic to heat up. the first possibility is that the plastic is just partially melted and will come loose if you load another filament and press down with it to push the first filament out.

If the filament remains stuck, more drastic measures mist be taken. If possible, get a paper clip or other extremely thin metal pole that is straight and hold it using pliers. Then apply pressure into the extruder, pressing the switch on the side of the head to remove the clamp that normally blocks the path of the metal.

If this fails, the the best course of action is to disassemble the extruder and search for another possible problem. Make sure the extruder has cooled before attempting to open the extruder.

Wednesday, December 6, 2017

How to Use the Graphtec CE6000-40 Vinyl Cutter

How to Use the Graphtec CE6000-40 Vinyl Cutter

Ben Pepper

     The Graphtec CE6000-40 is a vinyl cutter that is able to cut shapes out of sticker paper, allowing users to make their own custom stickers. Once mastered, it is easy to use and lots of different stickers can be made. This tutorial provides knowledge on the machine that will help make it easy to master.

Using the Graphtec Studio Program

     Projects must be made in the Graphtec Studio computer program prior to printing them out. Graphtec Studio includes lots of tools which can allow the user to customize their sticker. Some of these tools include:

  •  Draw a line, draw a rectangle, draw a round rectangle, and draw an ellipse, which allow users to draw the shape in the name of the tool.
  •  The draw a polygon tool makes it easy to draw lots of lines and connect them together to make a polygon. This polygon can be changed by double-tapping the shape, which allows the dots of the polygon to be changed.
  •  The draw a curve shape does what the draw a polygon tool does, but with curves instead of lines.
  •  The draw freehand tool does what the name implies. This tool can be useful in tracing a picture to making it into a sticker.
  •  The draw an arc tool allows the user to draw an arc with the ability to choose the radius of an arc and how many degrees it is.
  •  The draw a regular polygon tool can be used to draw a regular polygon with up to 60 sides.
  •  The text tool allows the user to write text, with the ability to change the font and size of the text. This text can be placed in a sticker.
  •  The knife tool is used to cut a shape into two separate pieces.
  •  The fill color and line color tools allow lines and the shapes to be colored, so that a difference can be seen between them.
  •  The trace tool allows a highlighted space to be copied.
  •  The design page tab modifies the size of the design page.

Cutting the Sticker

     To cut out a sticker made in Graphtec Studio, the cutters window needs to be opened. A message will pop up on the right of the screen which says "Could not connect to the CE6000-40." This problem can be solved by turning on the power button, which is on the left side of the vinyl cutter. Both the Graphtec Studio program and vinyl cutter will tell the user to "Load Media." This means that the sticker paper must be loaded into the Graphtec CE6000-40. The sticker paper roll should be placed behind the machine. There is two places with wheels where the roll needs to be placed.
     The sticker paper needs be placed through the vinyl cutter and under both sets of wheels. To do this, the rollers on which the sticker paper is placed might have to be moved. Once this is done, the lever in the back which is down should be pulled up to secure the sticker paper. Now, 3 options come up on the vinyl cutter screen. Option one (Roll-1 Front Edge) should be chosen, as excess sticker paper will return back to the original roll of sticker paper which will prevent any extra sticker paper from being used. The cutter is now ready to cut and the hitting the button "send to cutter" allows the program on the computer to transform into a sticker.

Taking the Sticker Out of the Paper

     To take the sticker out of the paper, the switchblade should be used. The lever in the back of the vinyl cutter can be pushed back down to release the paper. There is a crevice on the machine that allows the sticker paper to easily be cut in a straight line. But, before doing this, make sure to check where the sticker ends so that when the sticker paper is cut, there is no part of the sticker still attached to the roll of sticker paper. It can now be pulled off of the sticker paper and attached to any surface. To cut out any small letters the metal hook can be used. This will destroy the sticker letters but still allow the letters to show up as the color of whatever surface the sticker is attached to.

The Possibilities of the Vinyl Cutter

     So much can be done with the vinyl cutter. Using all of the tools that Graphtec Studio offers, I have been able to make such creations as a sun and a wreath with lots of different colors. It can be used to print out a sticker of anything, such as a whale, a name, and even a smiley face. There is so much that this vinyl cutter can do. Now, with background knowledge on the vinyl cutter, lots of stickers can be made.

How to 3D Print from Tinkercad to the Creator Pro

Have you ever wondered how to print your 3D Design from Tinkercad to the Creator Pro? Find out by watching the video below.

Properly printing with the Flashforge Creator Pro 3D printer

3D printers are enormously useful devices, with the ability to quickly develop physical products given 3D models. However, models directly exported from CAD software aren't printable using our 3D printer. Here, you will learn how to properly print your models

Sliced VS Unsliced

Files exported from most CAD software will be unsliced 3D models. There are several possible filetypes, most commonly using .stl. These files give information on what an object looks like, and allow for visualizing and manipulating the object in 3D space. These files are not printable by our printer in their current form.

An example of a .STL file
(taken from http://3dprintingninja.blogspot.com/2014/08/remesh-tool-how-to-convert-cad-file.html)


In order for the 3D printer to print a file, it must be of the .x3g filetype. This is a sliced 3D model— the original model is cut up into small pieces, which is then converted into a series of instructions for a printer to follow.
A closeup on a sliced model of a pyramid.
Notice the sharp edges due to slicing

Slicing your model

To convert your model file to a sliced model file, download a slicing software that is compatible with your 3D printer. In our case, we can use FlashPrint (Download Here!). After installing the software, it will ask you what 3D printer you are using. Select the option that reads "FlashForge Creator Pro". This will automatically set most of the settings appropriately for that printer. Once you're done with this, hit the blue "Load" button on the top of the screen, and select the file you want to convert.
The program after loading a file.
You can move, scale, and rotate your model in the buildspace by clicking the relevent icon, and clicking and dragging the model you wish to move. Make sure the model is touching the bottom of the plate, otherwise it will not print! Once your print is positioned properly, hit the Print button.


Make sure the print setting matches the type of plastic the machine is using, in this case, PLA. Then, choose the detail. Higher resolution options take longer to print, but end up looking more similar to the original model. Next, hit the more options button and head to the temperature tab. Make sure that the extruder temperature is set to 200 C and that the buildplate temperature is set to 0 C, for optimal building

All that's left to do is to hit OK, save the file, and copy it to the SD card for printing!

Tuesday, December 5, 2017

Carving with Carvey: An In-Depth Tutorial

The Carvey allows for some intricate design work with wood and plastics, but it does require proper knowledge to use. This blog post is your one-stop shop on how to use the Carvey to make designs of your very own.

Everything on the Carvey is controlled by their website at easel.inventables.com/carvey. You'll need to create an account, then you can get started!


First of all, it's important to know your material. In the top right of the page, there is an option to select your material (circled in red in the above image). This will give a dropdown menu to select your material. Pick the option most similar to what you are using. Directly to the right of that, you have to select your bit. These are differentiated by color and have different purposes for smoother or more precise cuts in certain materials. An exemplar for each type of wood is available next to the machine. These can easily be switched in the machine by using the two supplied wrenches. In the website, select whichever bit you are using. More in depth information on bits can be found here.
You also need the measurements of your material. You can use a ruler for width and length, but theelectronic caliper should be used to precisely determine the thickness of the material. Enter these into the measurement boxes (in the red box in the website pictured above).

Once you have your measurements, you can fix the material into place. Use the screws and stair-like stands to clamp the piece of wood into place in the bottom left of the bird, so the bottom left corner is clamped underneath the built-in corner clamp. Once that's done, you can get to work on your design.

Across the top of the menu are a few options for shapes and a pen tool to draw straight line. However, you likely want to go more in depth than that. The box labeled "T" is the option to insert text (in a green box pictured above). It gives many different font options and lets you enter customized text, which you can then resize and reposition. To the right is an option to insert icons, which gives a large list of built in images on the carved that you can insert, move, and resize with ease.
Most importantly, there is an option labeled "Import" (in the blue box pictured above). This allows you to easily insert an image found on the internet or saved anywhere in your computer. Select image trace from the drop down menu, then upload the image you want to insert. If the image doesn't show up as desired at first, try moving the threshold slider to the left or right. You can also change the smoothness to try to smooth out corners.

NOTE: Be careful not to place any designs where your clamps are attached. You can use the measurements on the cutting board and the website to make sure your design is positioned safely.

Once you have your design, you can edit a few different things. By selecting a piece of your design, you can change the depth with a slider or by entering the desired depth. You can also switch from carving out an entire design to just carving the outline by selecting outline instead of fill and vice-versa.

Once your design is complete, make sure the Carvey is closed and press the carve button in the top right. At any time, you can pause the carve bob pressing the pause button which will replace the carve button or by pressing the blue button on the bottom right of the Carvey itself. Once the carve is done, unscrew the clamps holding your material in place and remove it.

NOTE: Once you are done, use the vacuum cleaner to clean out the inside of the machine of all sawdust.

As you test out what is possible with Carvey, you may start to play with some more advanced features. However, the more complex features are not at all necessary for making the most out of Carvey, especially with a beginning project.

What is the Wen Bench Drill Press?

The Wen Bench Drill Press is a heavy duty machine that is capable of drilling perfect holes into materials such as wood or dense plastics. Prices can range from $19.99 to $633.83. They all range in ability and speed. It's an incredible tool to have access too.

      How to Use the Wen Bench Drill Press

1.) Firstly, select the wood or material that you want to use and then mark the place that the machine will drill into.You can make the marking in pen, pencil, or marker, or skip it entirely. Sometimes using a weight to hold down the piece of wood is very helpful in securing the apparatus.
2.) Make sure the machine is plugged in to an outlet and then turn on the laser. The laser can easily be turned on by pressing the button that is marked “laser” on the front until it is switched to O. The laser will help you line up the actual drilling piece with the desired mark.
*Before turning the machine on, decide on the size of the drill bit and secure that in*
3.) Reconfirm that the lock on the machine is not on and then use the lever on the side to lower the now spinning drill bit until it has fully punctured your material. This should mean that you are pulling the lever towards yourself. Once it has fully drilled the hole, you can lift the bit up by lifting the lever in the opposite direction- which should result in the lever being pushed away from yourself.
4.) The hole should now be made, however it is possible that the drill bit did not fully go through and will need another session of drilling. To do this, just repeat step 3. The hole could have splintered the wood or other material which can easily be fixed by sanding down the edges. This may or may not be needed, depending on the purpose of the hole or on what material that it was drilled into.

How to Use the Cardboard Rolling Cutter

How to Use the Cardboard Rolling Cutter 


Introduction: 

Here, in the makerspace, cardboard is used on a daily basis. To handle that cardboard, tools are needed to cut it. Often, due to the thickness of the cardboard, scissors are not productive. Thus, the cardboard cutter is an important tool that everyone should know how to use. 

Directions:

  • To charge the device, connect the charger to the outlet and the wire to the device. When, the wire is plugged in properly, a light will shine.
  • When cutting cardboard, align the blade properly. Then, press the black button on the top of the device to activate the blade. 


In closing: 

When using this simple tool, it is important to remember it is a machine. Therefore, it should be treated as such and should be used safely. For example, it should never be left on the edge of a table. Otherwise, it has the potential to fall off.


This device, when used properly can be used to foster student creativity. For example, the snoopy house on the right. 

For more information on about this device click here.

Wednesday, October 18, 2017

GRAPHTEC Cutting Plotter CE6000-40: Vinyl Cutter

GRAPHTEC Cutting Plotter CE6000-40

 Vinyl Cutter


             The Graphtec CE6000-40 Vinyl Cutter is a very interesting and amazing machine that is available here at the AIC Makerspace. With this machine, you are able to express your ideas in vinyl form, as you are able to create your own designs to be printed. The Graphtec Vinyl Cutter can make your dreams a reality!


Photo Gallery of the Vinyl Cutter!


A few of  things the vinyl cutter can do are listed below:
Photo By Chris Connors

  • Labels! In a classroom or even your own home, vinyl stickers can be used as signage an labels. The signage in a classroom can indicate where things are located and exit signs etc.
  •  Decorate projects and walls with a vinyl cutter. The design that comes out in the vinyl sticker paper is in the control of the user, which allows for endless possibilities.
  •  T-shirts- A commonly used method of transferring your design onto a t-shirt is called silkscreening. This is simply the transfer of an image onto a t-shirt through areas blocked off in the vinyl. A tutorial on silkscreening with vinyl by maker Chris Connors is listed here: https://makezine.com/projects/make-36-boards/vinyl-silk-screen-printing
What we have already used the vinyl cutter for in the MakerSpace:

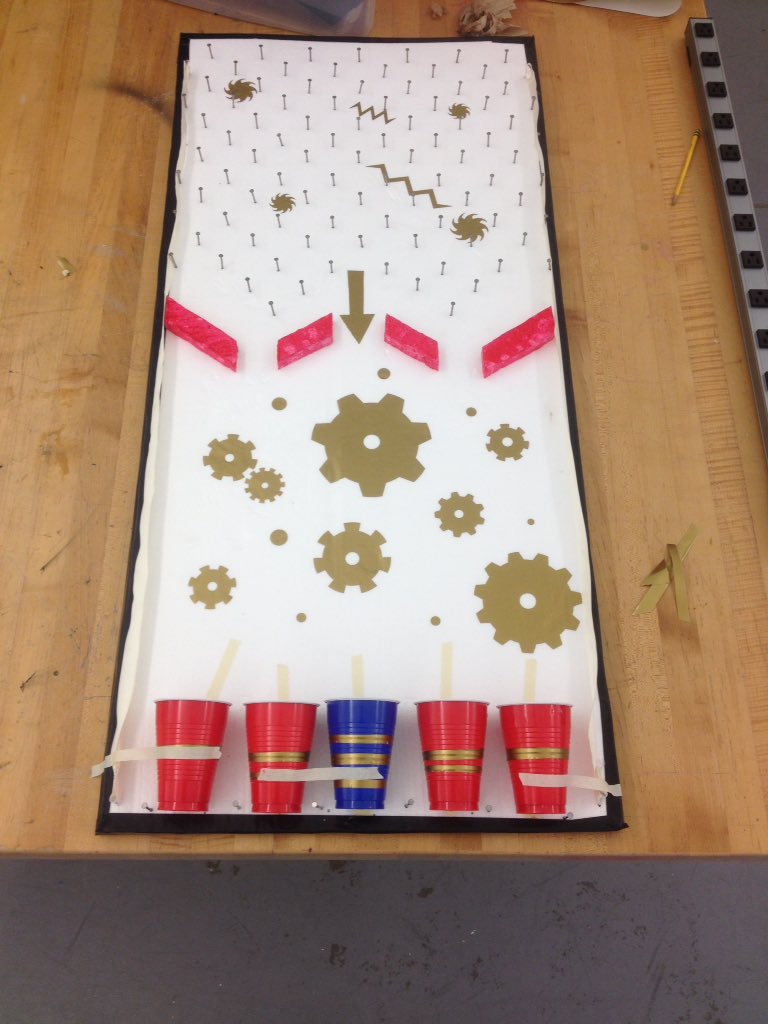
The Almost finished Plinko Board
Photo by Chad McGowan

      For Ashland Day, a few mentors (including me) got together to create a game for the kids to play while outside. We came up with the idea of a Plinko board; a game that is based on the luck of a ping-pong ball going through a series of obstacles made of nails to get a prize. To decorate it, we put vinyl stickers on the Plinko board, and it made the game look 100x better. For the sign, we printed out vinyl letters to paste on some cardboard, which looked very neat and complete because of the vinyl. 


          The Graphtec Vinyl Cutter here at the AIC Makerspace is one of our most prized possessions. As shown, it has proved to be a very useful machine for the mentors and will continue to prove so, as we start new projects with the Vinyl Cutter. Not only this, but the students that come by to the afterschool Makerspace programs will also be able to use this amazing machine, while the mentors get to watch their ideas come to life.